FIRST THIS IS NOT ME TURT!!! THIS TURT IS FROM MOPARSCAPE
Some helpful tools not included within this topic that may help you get your server started may be downloaded
here.
Downloading winRarTo start off, we'll download Winrar. Winrar is a program in which you can use to extract files from .rar format, you may download it
hereDownloading and Installing JavaAfter you have done so, we will need the latest version of the Java Development Kit found
here. Once you have selected the latest version of Java Development Kit, there will be a question asking which platform you have, or operating system. After you have chosen your platform, you then need to agree to the terms and services and as the next page loads, click "Download Selected with Sun Download Manager". From then on out, let it install and you'll be okay.
Here are the steps below.


 Getting No-Ip
Well, if you're going to have your server remain public, you're going to have to get No-Ip. No-Ip is a free service where you can use for websites, or servers.
First, you're going to go
here and register an account at the site. You will then click 'Your No-IP' at the top right corner of the page. Then you need to click the 'Hosts and Redirects' button. After you have done so, it will bring you to a page showing your listed domains that you have added, though if you haven't added any you're going to click 'Add a host'. After you have added your desired domain, you're going to need to download the No-Ip Duc, located if you click the button 'Download' on the main page. Like you have done before when downloading Java, you're going to need to select your operating system and let it download.
Pictures of the steps shown below.


Now once you have downloaded No-Ip Duc, run it and it should look like the picture below.

Then all you need to check the box next to the domain you want people to log into, and you're good!
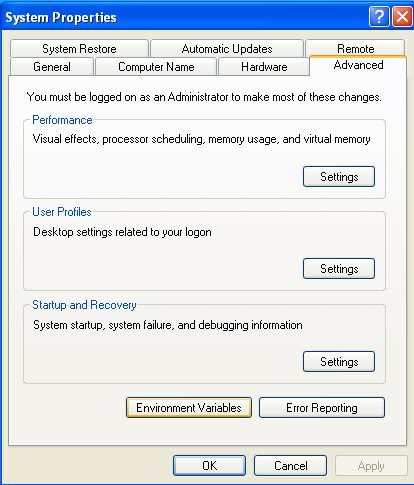
Setting up your Environmental VariablesEnvironmental variables are what allows you to run your server with Java, without it you would simple get 'The path is not yet specified' so this is an extremely important step. We will firstly open 'My Computer' and click 'View System Information'. As you do this, a small applet displaying several tabs, and you will select the one that says 'Advanced' and at the bottom, click 'Environmental Variables'. Now what you're going to do, is go to your 'Path' and 'Classpath' variables and edit them.
In your Classpath variable, you're going to take everything currently inside it and edit it with your latest version of JDK, so right now it would be;
</SPAN>
| Code: |
CLASSPATH=C:\Program Files\Java\jdk1.6.0_11\bin;%CLASSPATH%;
|
Though if a newer version comes out, you would change the 'jdk1.6.0_11' to the newest version.
After you have done the Classpath variable, you're going to find the Path variable and add the code below inside it.
| Code: |
C:\Program Files\Java\jdk1.6.0_11\bin;
|
The same goes for Path, if you download a newer version of JDK then you're going to change the 'jdk1.6.0_11' to your current version.
Here's a picture.
 Downloading a source/base
We're going to need to have something to start from, so choose one from the download section
here. The base you've downloaded could be anything you want, it's your choice. Now when you had downloaded the Winrar program earlier, this is where you'll be using it. Once you have found the base of your choice, you will need to go into the base file, and once you've done so you need to right click it and click 'extract'. Once it's done extracting, you then are free to roam about your source.
Steps are shown below.


 PortForwarding
From what I've seen from many of you members is that PortForwarding is the hardest step to comprehend, so I'm going to try

. As I have an old router I may still attempt showing you how, though if anyone feels they may give me pictures of their router that would be great.
First of all, portforwarding is merely a step to allow people connecting to your computer, but in this case it's for connecting to your server. We will first start off by opening your command prompt or 'cmd' through your startup window and typing 'ipconfig' which will bring up a list of details relating to your computer, but all we really need is your default gateway. You can find your default gateway if you scroll down, so once you have done that, open up your internet browser and type it in. This will then bring up your router page, and you will need to click something like 'Applications and gaming', though mine just says 'Firewall'. After you have clicked this, you need to add a new user defined application. Any name is compatible, as long as you follow the syntax shown below and set the application to 'hosted'.


If you feel I need to add more on to the port forwarding section, please ask.
I wish I could have given more pictures on the PortForwarding step, though my router is old and I don't think you would have understanded. If any of you benevolant members would be so kind and give me some pictures I'll be gladly to put them on here, thanks for reading!